Showing posts with label how to. Show all posts

Saturday, November 24, 2012

Fall Fashion: Cozy Sweaters

A cozy, slouchy sweater is perfect for fall!
Hello, my lovelies! Did everyone have a fabulous Black Friday? Well, today is Small Business Saturday, so go and support your family and friends and neighbors that own their own businesses!

An Aisles of Beauty reader asked me recently what type of sweaters she should wear with her smokey eye. For those unaware, Sweaters and Smokey Eyes is a gorgeous, classic fall look, and its also the name of my first Youtube video. I teach you how to create the perfect smokey eye to match your fabulous sweaters. Watch it here.

In addition to the sweaters you see in my Youtube video, I thought I'd compile some pics of cute fall sweaters than can easily be paired with a smokey eye... My favorite is the pink sweater you just saw. Here are some more, credit to Tumblr:


As long as you feel comfortable and stylish in the sweater you're in, it's perfect. Enjoy your Small Business Saturday, and get ready for Cyber Monday! 

Stay beautiful!

Monday, November 5, 2012

6 Friendly Tips on Dyeing your Hair

Hello, my lovelies! This weekend was busy, I had nonstop rehearsals for Cedarbrook Theatre's Fall Drama, The Curious Savage. (Live in eastern PA? Come see the show! Visit cbktheatre.org for more info.) For those who have never heard of it, it's a hysterical comedy about an elderly widow named Mrs. Savage who was left with 10 million dollars, and she wants to do good deeds with it. Her stepchildren, however, have different, more selfish plans. I play Mrs. Savage, and that requires my hair to be blue. Yes, blue. 

I had to dye my hair blue for the show, and I thought I'd give you a few tips on dyeing your hair. Keep in mind these tips are all from my experience, and I used a temporary rinse blue dye.

1. Pick a good brand. The quality of the dye you choose all depends on the brand you buy. I went to a place called House of Beauty, and the employees helped me find a good brand for my hair.

2. Dark haired girls, beware! For girls with dark hair like mine, bleaching is often necessary to get the color you want. But bleaching is unhealthy, and can mess up your hair permanently. Talk with a professional for other options... Unless you plan on dyeing your hair permanently...

3. Get some help. Whether you're getting it dyed in a salon, or dyeing it at home like I did, you'll want an extra set of hands to help. My mom helped me get all the blue coloring in my hair, and help me do all the rinsing and such.

4. Read the directions. This is an obvious step, but different brands have different methods, it isn't the same process... Especially with how long you leave your hair under the dryer. Some brands say 10 minutes, others say 30. Pay attention!

5. Avoid the skin. Most hair dyes will tell you to use cream or petroleum jelly to guard your hairline, and that's important. I spent 20 minutes with a bottle of rubbing alcohol trying to get blue spots off of my face and hands. Cover up and wear gloves!

6. Know what you're doing. Woops! You accidentally got permanent dye rather than semi permanent! Now you're stuck with pink hair forever! Oopsies! Yeah, don't let that happen. Talk with professionals (employees at beauty stores, your hairdresser, your neighbor that just happens to be an expert dyer...) before doing anything you're unsure about. This is changing your hair color we're talking about!

I'll tell you in detail about my experience dying my hair blue next time.

Stay beautiful!

Saturday, November 3, 2012

Sweaters and Smokey Eyes: My First Youtube Video!!

OMG! I'm on Youtube!

Hello, my lovelies! This past week has been particularly inspiring. Because of disastrous feats of nature (cough cough Hurricane Sandy), I've been given more time to devote to working on my blog. And in that time I've done something wonderful. Remember in my Fall/Halloween Nails post when I mentioned a BIG surprise? Something you've been waiting for a very LONG time? 

Oh yes, if you're thinking MY FIRST YOUTUBE VIDEO EVER, you're spot on! Just minutes ago I uploaded Aisles of Beauty's first Youtube Tutorial: Sweaters and Smokey Eyes. Be the first to learn how to create a beautiful bronze smokey eye in this classic fall look on my Youtube Channel! And this is just the first of a string of surprises to be revealed; November Surprise #1 is complete.

Click here to view the tutorial: http://www.youtube.com/watch?v=Do0V_ZMdQgA&feature=plcp

Like it, leave comments, share it with your friends, and help me go viral! 

And now that this lovely surprise is revealed, it's time to get started on November Surprise #2.

Stay beautiful!

Tuesday, October 30, 2012

How to Conceal a Zit

Yikes! That's a big one!
Hello, my lovelies! Because of Hurricane Sandy, my parade was rained inside all day, but I got a lot of work done, thankfully. Of that work includes this photo tutorial on how to conceal an unsightly blemish. Every teenager gets zits, pimples, blemishes, whatever you want to call them. How to conceal them is a lifelong skill you'll want to know forever.  ;)

Because I have an HD Camera, you can only see the difference slightly, but in person, there's a dramatic difference. Try it out, and you'll see!

You'll Need: Concealer, Foundation, Foundation Brush, Concealer Brush (optional)

I used: Too Faced Flexible Coverage Concealer (but only because it was the only one at my disposal at the time), Sephora Mattifying Foundation, BareMinerals makeup brushes.


Stay beautiful! 
Monday, October 29, 2012

Fall/Halloween Nails

Fall Leaves in Halloween Colors! 2-for-1 bonus!
Hello, my lovelies! How's Hurricane Sandy treating you? School's out for the day (precautionary purposes), and I'm spending the day prepping for a BIG SURPRISE for all you wonderful readers, something I know you've been waiting for a long time. Feel free to let the mystery drive you crazy. =)

Whether you're out of school or not, I decided to start up the week with some Halloween themed nail art. I personally hate Halloween and all the scares that come with it, but it's a great time for costumes, candy, and nail art! So, I combined the beauty of fall leaves with the colors of Halloween to make a 2-for-1 special!

All you have to do is paint your nails like you regularly would with orange polish, then with a detailing brush (or a toothpick), use black nail polish to create the veins of the leaves. Simple, right? Let me know what you think, and send me your nail art to aislesofbeauty@gmail.com.

Stay beautiful!

Monday, September 10, 2012

Top 5 Party Must Haves

A picture I took at the Bar Mitzvah I went to...
Hello, my lovelies! So this weekend, I went to my close friend Jacob's Bar Mitzvah, and it was absolutely amazing! I have to say it made the Top 3 without question. Unfortunately I didn't film myself putting on my makeup, but I'll redo the makeup for a tutorial later this week.

Every time I've prepared for a Bar/Bat Mitzvah, or any party where I know I'll be dancing, I always freak out about what to wear and what to bring and all that jazz. By now I've mastered the art, and thought I'd enlighten you on Party Must Haves, besides the gift.

What to Wear: Keep it light. With dancing comes sweating, and heavy clothes are just going to make that worse. Even if it's hailing in the middle of winter, it's going to be hot on the dance floor surrounded by people! To this one I wore a leopard print dress... But get this, I tucked it into some skinny jeans to make it more casual. It was very cute!

Makeup: I cannot stress this enough: Dancing = Sweating. Don't wear creme eyeliner or any kind of smudging makeup. Here's what I did: I wore my Sephora Mattifying Foundation to keep the shine off of my face, did my signature party bronze smokey eye, and added a nude lip. I kept my mascara minimal; just enough to put some "umph" in my lashes. If you have to wear liner, make it liquid liner, because that's the least "smudgeable" type.

Me at a Bat Mitzvah earlier this year.
In my purse: I brought my foundation brush and my Sephora Mattifying Foundation for touch ups, because that last thing I needed was a face covered in shine! I also brought mascara for touch ups, and lip gloss of course. Oh, and hair products! I always bring a comb and ponytail holders, because your hair may get a little wild and crazy like mine. And I always bring a needle and thread in case of a fashion emergency. I recommend safety pins if you can't sew, in fact that's better, I just can't ever find safety pins around my house anymore!

So here's your Top 5 Must Haves:

  1. Light Clothing
  2. Hair Supplies (comb, hair ties)
  3. Mattifying Powder of some sort
  4. Touch-Up Makeup (mascara, liquid liner, lip gloss, etc.)
  5. Safety Pins (or needle and thread)
Simple enough, right? Good luck at your next big bash, and have fun!

Stay beautiful!

Wednesday, August 29, 2012

How to Create Marble Nails

I made a collage of all types of marble nail looks!
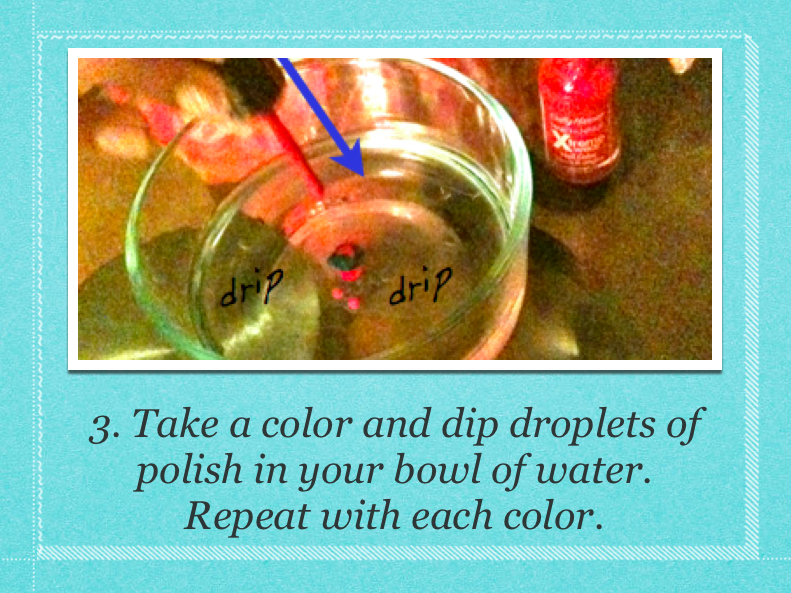
Hello, my lovelies! In addition to researching great DIY Spa Ideas, my youngest sister Ava learned how to create Marble Nails. Usually, I don't pay much attention to the latest nail trends, because I have the terrible habit of biting my nails, and I've never really been able to do much with my nails because of that. But Ava has long, gorgeous nails, and so I took pictures of her attempting Marble Nails, and made a photo tutorial for you so you can try it too! 

You will need: a small bowl, 2-3 nail polish colors, tape, and tissues/paper towels.


*** We only tried this with two nails/one at a time. The first nail is the one you see in the pictures. The second time didn't turn out so well, so we came to the conclusion you have to use fresh water/paint every time. Maybe you can dip multiple nails in at one time, but we're not sure. So let us know if you find out more!

Stay beautiful!

Tuesday, August 28, 2012

DIY Spa Ideas

My youngest sister Ava's DIY Spa

Hello, my lovelies! So Sunday night my youngest sister Ava wanted to test out some spa do-it-yourself's she found online. And since my mom is on a ridiculous "nature food" health kick, our refrigerator is full of all types of fruits and vegetables. Ava got busy and treated me to a lovely spa evening!

I decided to bring my notebook and take notes and pictures during the evening, so I could document everything Ava learned. She taught me a lot of great DIY Spa Ideas, and so now I'm sharing them with you!

Water with lemon
For a most professional and relaxing spa, Ava provided glasses of water with lemon slices. Not only did it look fabulous, it tasted pretty good too. Bonus: lemon water is packed with Vitamin C, can reduce acne, wrinkles, and cleanses your skin from the inside, giving you a healthy glow!

Ava's Spa Treatment began with Heat Therapy. In a small bowl filled with steamy water were hot wash cloths, which we gently rung out and placed on our faces. Then we could lie down and relax with the hot towels resting from the forehead to our noses (so we still had room to breath deeply through our mouths). 

Heat relaxes the muscles, and you'd be surprised how stressed the muscles in your face are from so much usage. This is very calming and relaxing, and so simple!

Oatmeal Facial
Oatmeal has so many uses besides eating it for breakfast. It's a phenomenal skincare ingredient! You can use oatmeal to treat acne, soothe the skin from rashes and poison ivy, and use as a facial scrub! It can help cleanse the pores and soften your skin!

Egg whites are full of protein, vitamins, and minerals. Egg whites have the potential to reduce wrinkles, tighten skin, give a deep cleansing to the pores, and leave your skin soft and supple!

What happens when you combine the two? Ava mixed oatmeal, warm water, and egg whites to create a fantastic deep cleansing, skin softening Oatmeal Facial. And all you need are those three ingredients and a mixing bowl! We applied spoonfuls to a damp washcloth, then massaged that cloth all over our face and relaxed for 6 - 8 minutes. Once the mask starts to dry, or if it feels tight on your face, just rinse it off and feel the softening effects on your skin!

Fresh cucumber slices
Cucumber slices on the eyes can reduce puffiness and erase fatigue. Its cooling effects do wonders for the skin, and cucumbers can soften the skin and improve your complexion. Did you know you can also use cucumbers to treat sunburn? We took some Cucumber Slices and laid them on our eyes as we let our Oatmeal Facials rest on our faces. It was a rejuvenating experience!

At the end of the spa night, I have to say, I was glowing. Next time you want a relaxing spa day, try these DIY Spa Ideas, and let me know what you think! And do you have any of your own DIY Spa Ideas to share? Tell me all about them!

Stay beautiful!

Thursday, August 23, 2012

In the Classroom: Skincare (Part Three)

My personal roundup of skincare products!
Hello, my lovelies! This is the third and final piece of the In the Classroom: Skincare series. You've learned all about the science of your pores, the Beauty Sectors of the Face, and with the help of the Aisles of Beauty Skin Type Chart, you've found your skin type!

Woah, that's a lot! But all of it was in preparation for the big finale. It's time to take everything you learned and design a beauty routine perfect for YOU!

Remember when I said how personalized skincare is? It depends on your skin type, allergies, preferences to smell and texture, and pricing is a biggie, too. At this point, deciding what products to use is completely up to you, and what you know is perfect for your skin. It's a trial and error process; you may find one product that's great, and another that isn't so hot. From here on, the only thing I can do is let you know what kinds of products you should be looking for. I'm talking about your Beauty Routine. Your Beauty Routine is designed specifically and exclusively for YOU, based on your schedule and all the other factors I listed earlier. 

You should wash and moisturize your face every morning and every night for the healthiest, most glowing skin possible. Here's a basic guideline of how your beauty routine should work in the AM and in the PM.

Morning: Wash your face with a gentle facial cleanser. Moisturize with face lotion. 
Most recently, I've been using Aveeno Ultra Calming Foaming Facial Cleanser and Clarins Paris Multi-Active Jour. My mom got Multi-Active Jour for me, so I'm not sure where you can find it.

Evening: Wash your face with either the same facial cleanser or a slightly stronger one (your choice). Use toner to cleanse away chlorine and clean out pores. Moisturize with long lasting lotion.
I use Proactiv's Three Step System every few days for a stronger cleansing. The three step system comes with a cleanser, toner, and acne cream, so this spring/summer I've been using that kit's toner. I moisturize with St. Ives Intensive Healing Lotion. I like to wear it to bed because even though it works wonders, it smells like bananas. O_o

Let's review! Here's your shopping list:

  1. Facial Cleanser (two if you want to change between AM and PM)
  2. Toner
  3. Face Lotion
When buying these products, think about your skin type. A person with dry skin would want to use a higher power moisturizer than someone with oily skin, and if you have sensitive skin, be VERY careful when buying toner. Opt for a toner without alcohol for the sake of your face. And combination skin people! You may have to buy multiple cleansers and lotions to take care of your dry areas and oily areas. Some reputable companies that are fantastic with skincare are: Aveeno, Cetaphil, Clarins, Clean and Clear, Clinique, and Neutrogena. There are tons more to try out, ask the staff of different stores and companies for advice; they'll be more than happy to help! 

It's been a pleasure educating you all on the basics of skincare! Take my advice and go create your perfect beauty routine! What products do you use? What brands are your favorite? Leave it in the comments or let me know!

Stay Beautiful!

Wednesday, August 22, 2012

In the Classroom: Skincare (Part Two)

The Beauty Sectors of the Face.
Hello, my lovelies! I'm feeling much better today... I slept in and had some breakfast, cleaned my room, put my laptop on my desk, and I've spent a solid two hours so far of pure Aisles of Beauty work all business-like. I've been making minor site fixes, working on posts, and (SPOILER ALERT) there might be a collaboration of some sort in the near future... Feel free to let the mystery drive you crazy. :)

If you haven't already read Part One of the In the Classroom: Skincare series, I recommend reading that first. Now let's get started!

The first part of today's lesson is about the Beauty Sectors of the Face. Look at the picture to your left. There are four main named sections on the face that we refer to when talking about skincare. 

  • The T Zone - refers to forehead down to the tip of the nose, creating a T shape.
  • The Eye Area - refers to the skin surrounding the eyes.
  • The S Zone - refers to the cheeks.
  • The O Zone - refers the chin and the area around the mouth.

You'll need to think about the Beauty Sectors of YOUR Face to determine your skin type. Once you know your skin type, you'll finally be able to to pinpoint the best products for you!

There are 5 main skin types: normal, dry, oily, combination, and sensitive. Using the Official Aisles of Beauty Skin Type Chart, find which of the 5 main skin types sounds most like your face! Just click on the chart to enlarge it.


Once you determine your skin type, come back tomorrow for Part Three!

Stay Beautiful!

Sunday, August 19, 2012

Random Makeup Tips

I'd kill to have this makeup collection!
Hello, my lovelies! So these last few entries I realized have not been all that helpful to you... And in the hectic time of Back-to-School, it'd be nice to have some advice, wouldn't it?

So I went on a hunt to find the best makeup advice, tips, and myths revealed for our first ever Back to School Beauty Week! Consider this a crash course in beauty school. All week, I'll be providing you with all types of helpful makeup and beauty info! Day One's lesson shows tips people don't know, but should, because they're extremely smart!

I found all of these super cool tips on http://makeuptips-blog.com/. This blog is dedicated to providing HUNDREDS of makeup and beauty tips from start to finish. And using more PDF technology, I designed an adorable little page for you! Enjoy!


Just like always, you can zoom in and out of this page, and scroll down to read everything. Hope these tips are helpful for you, and if you have any makeup and beauty questions, I'd love to answer them here!

Stay Beautiful!

Sunday, July 29, 2012

The Info Aisle: Makeup Brushes

Click to enlarge and learn how to clean your makeup brushes!
Hello, my lovelies! Thanks for all of your concern over my hand, it's fine–healing, and I'm spending the day with another friend of mine getting my mind off of it.


This week, I want to try something a little new. I'm going to give my week a theme... Let's see where this goes.


This week's theme gives tribute to an often overlooked side of makeup artistry: The Makeup Brushes. They're what we use to paint our faces with color and expression!


For the first day of the week, Sunday, you all are going to visit The Info Aisle, one of the many Aisles of Beauty. (Ah, the name is making sense now, isn't it?) In the Info Aisle, let's learn about cleaning our makeup brushes. Just click on the image, and it will enlarge, so you can see crystal clear all the simple steps to washing your brushes!


And if you don't know much about brushes at all, don't worry. You will be an expert by the end of the week!


** All of these informative posts about makeup brushes will also be posted on The Classroom page, so once they're archived, you'll still be able to easily find them!

Wednesday, May 23, 2012

Mood Boards... Or Whatever You Call Them.

My latest Mood Board. Took approx. 2.5 hours.
Call it whatever you want. Mood boards, beauty boards, collages... Whatever you call it, the definition is a personal manifestation of whatever you're thinking of at the time in the form of art. I call them mood boards, because the way I'm feeling usually controls the finished product. The reason why I'm dedicating a post to this is because I feel the duty to inform every girl of a productive way to make a wish list, get out some feelings, create a shrine to your favorite hobbies or celebrities... Or just do it for fun.


I like mood boards because it's a real project, but not the kind that takes several days. Just a few hours and you're free to let your creativity shine through. I also find it brings me to a point of serenity that meditating has never done. Focusing on this one thing; I forget about everything else. I barely even think. I get away from the world for a few hours and when I'm back, I have something beautiful. So I'm going to give you a brief text tutorial on how to create your own Mood Board, because maybe the same effect will happen to one of you.


Steps:

  1. Get a bunch of old magazines. You can get these from friends, family, etc. (I get a ton of my mother's old magazines; I don't have the heart to cut up my own.) My mood boards always relate to fashion & beauty, and some great magazines for this are Marie Claire, Allure, Oprah, and I use US Weekly, People, Essence, and Parenting, because sometimes you find miscellaneous items in there.
  2. I usually tear out the pages first before I cut to prevent frustration and accidental multi-page chopping. After I culminate a pile of pages, I cut out my favorite parts. Make sure you have a lot of little things to fill in the gaps that come between the bigger stuff. Too much big stuff means too much overlapping, and that may cover up too much of your cutouts!
  3. I haven't made many mood boards, so I'm still at a loss to find the best way to glue the cutouts onto the board. (Use a glue stick by the way, liquid glue is too much of a hassle, and tape runs out too easily.) I like to arrange all my cutouts on the board first, and then very carefully lift a piece or two up at a time, and glue them down. This way I don't have to worry about gluing EVERY piece, but make sure the room you're in isn't drafty or you'll be very annoyed.
Tips:

  1. Cut out more than you need. It's better to have tons of pictures and fill in all the spaces than have not enough pictures and big ugly gaps on your board. 
  2. Don't be too restrictive. If you want to follow a certain theme, that's fine, but let your instinct bring you to the pieces you love. Don't say, "Oh this doesn't perfectly match my theme." You won't have enough cutouts and you'll regret it later.
  3. I don't listen to music when I do this. And I'm always listening to music. But music might influence what I'm looking for. You know when you're writing and someone is talking and you accidentally write the word they had just said? Music can influence your art like that, and I want my mind to do all the talking.
  4. Make sure you have a large block of time to do this. I HATE when I'm diligently working on my mood board and suddenly I'm called for dinner. Clear your schedule and eat first. Distractions get you out of the zone!
I dare you to comment about any mood board you've done, or any questions you have about a mood board... Or whatever you want to call it.


Loving Watchamacallits (mood boards for me),


Autumn =)