Showing posts with label DIY. Show all posts

Sunday, November 11, 2012

Reader's Look: Blue Hair

Maya from Mexico dyed her hair blue in honor of me! I love this girl!
Hello, my lovelies! This weekend has been particularly irritating, because after two amazing nights of The Curious Savage, karma just had to catch up with me and break my computer. I didn't spill anything this time, it just won't let me log into my account! But I had to write an essay for Spanish, so we pulled some strings and here I am on my mother's computer, blogging to you about the highlight of my weekend since Friday.

Today I received the most amazing email from a loyal reader in Mexico named Maya. Talk about Universal Beauty. =) Technically, I already know her personally... She's my Secret Twin! We have the same birthday, June 10, and we keep in touch. Here's the email:
Well Secret Twin!
As you know, I die my streaks quite often! I've had them purple, teal, pink, blonde, and then I died them back to brown for a while. But I got bored with that, and I decided I wanted to die them again. So, in honour of my Secret Twin's debut with blue hair, that's the color I picked for mine as well! How did your play go, anywayz? Are you going to post it on your bloggity blog blog?
Yup. Check out her gorgeous blue locks in honor of my dyeing MY hair blue for the play! Love you Maya! {Want to email me your pics? aislesofbeauty@gmail.com!}

Stay beautiful!

Wednesday, November 7, 2012

Youtube Requests

A glimpse of my Youtube Channel. Subscribe today!
Hello, my lovelies! Tomorrow and Friday are production nights for The Curious Savage (Want to see it? Visit cbktheatre.org for more info.), and that means I'll have much more time to devote to Youtube. 

I'm planning on filming something this weekend, but I want to know what you want to learn. This is your time to make requests for any Youtube videos you want to see from me! Comment ideas below, send me an email {aislesofbeauty@gmail.com}, or comment directly on my Youtube Channel! 

My Youtube Channel: https://www.youtube.com/channel/UCHvaT5OzBSaNM0dCnIeiuTA/videos?sort=dd&flow=list&view=0

Don't forget to subscribe to my channel, share my videos with friends, and let me know what you want to see!

Stay beautiful!

Monday, November 5, 2012

6 Friendly Tips on Dyeing your Hair

Hello, my lovelies! This weekend was busy, I had nonstop rehearsals for Cedarbrook Theatre's Fall Drama, The Curious Savage. (Live in eastern PA? Come see the show! Visit cbktheatre.org for more info.) For those who have never heard of it, it's a hysterical comedy about an elderly widow named Mrs. Savage who was left with 10 million dollars, and she wants to do good deeds with it. Her stepchildren, however, have different, more selfish plans. I play Mrs. Savage, and that requires my hair to be blue. Yes, blue. 

I had to dye my hair blue for the show, and I thought I'd give you a few tips on dyeing your hair. Keep in mind these tips are all from my experience, and I used a temporary rinse blue dye.

1. Pick a good brand. The quality of the dye you choose all depends on the brand you buy. I went to a place called House of Beauty, and the employees helped me find a good brand for my hair.

2. Dark haired girls, beware! For girls with dark hair like mine, bleaching is often necessary to get the color you want. But bleaching is unhealthy, and can mess up your hair permanently. Talk with a professional for other options... Unless you plan on dyeing your hair permanently...

3. Get some help. Whether you're getting it dyed in a salon, or dyeing it at home like I did, you'll want an extra set of hands to help. My mom helped me get all the blue coloring in my hair, and help me do all the rinsing and such.

4. Read the directions. This is an obvious step, but different brands have different methods, it isn't the same process... Especially with how long you leave your hair under the dryer. Some brands say 10 minutes, others say 30. Pay attention!

5. Avoid the skin. Most hair dyes will tell you to use cream or petroleum jelly to guard your hairline, and that's important. I spent 20 minutes with a bottle of rubbing alcohol trying to get blue spots off of my face and hands. Cover up and wear gloves!

6. Know what you're doing. Woops! You accidentally got permanent dye rather than semi permanent! Now you're stuck with pink hair forever! Oopsies! Yeah, don't let that happen. Talk with professionals (employees at beauty stores, your hairdresser, your neighbor that just happens to be an expert dyer...) before doing anything you're unsure about. This is changing your hair color we're talking about!

I'll tell you in detail about my experience dying my hair blue next time.

Stay beautiful!

Saturday, November 3, 2012

Sweaters and Smokey Eyes: My First Youtube Video!!

OMG! I'm on Youtube!

Hello, my lovelies! This past week has been particularly inspiring. Because of disastrous feats of nature (cough cough Hurricane Sandy), I've been given more time to devote to working on my blog. And in that time I've done something wonderful. Remember in my Fall/Halloween Nails post when I mentioned a BIG surprise? Something you've been waiting for a very LONG time? 

Oh yes, if you're thinking MY FIRST YOUTUBE VIDEO EVER, you're spot on! Just minutes ago I uploaded Aisles of Beauty's first Youtube Tutorial: Sweaters and Smokey Eyes. Be the first to learn how to create a beautiful bronze smokey eye in this classic fall look on my Youtube Channel! And this is just the first of a string of surprises to be revealed; November Surprise #1 is complete.

Click here to view the tutorial: http://www.youtube.com/watch?v=Do0V_ZMdQgA&feature=plcp

Like it, leave comments, share it with your friends, and help me go viral! 

And now that this lovely surprise is revealed, it's time to get started on November Surprise #2.

Stay beautiful!

Wednesday, August 29, 2012

How to Create Marble Nails

I made a collage of all types of marble nail looks!
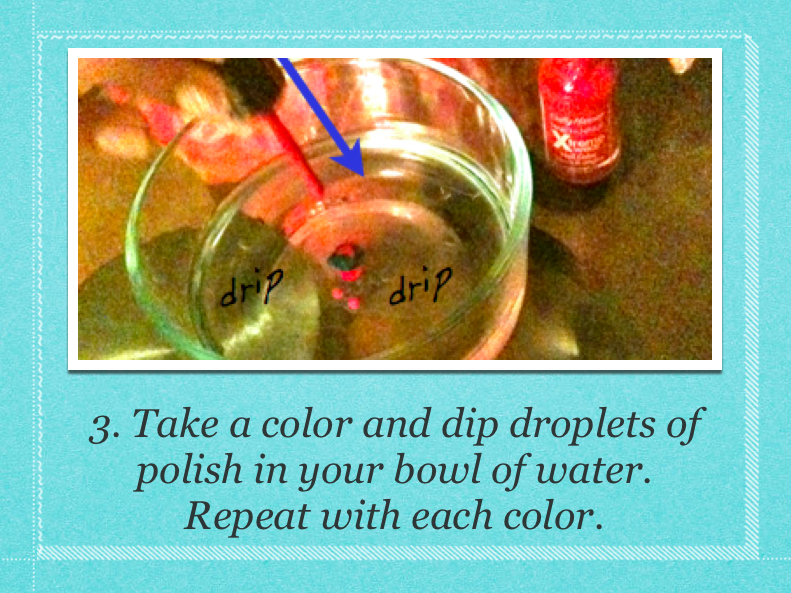
Hello, my lovelies! In addition to researching great DIY Spa Ideas, my youngest sister Ava learned how to create Marble Nails. Usually, I don't pay much attention to the latest nail trends, because I have the terrible habit of biting my nails, and I've never really been able to do much with my nails because of that. But Ava has long, gorgeous nails, and so I took pictures of her attempting Marble Nails, and made a photo tutorial for you so you can try it too! 

You will need: a small bowl, 2-3 nail polish colors, tape, and tissues/paper towels.


*** We only tried this with two nails/one at a time. The first nail is the one you see in the pictures. The second time didn't turn out so well, so we came to the conclusion you have to use fresh water/paint every time. Maybe you can dip multiple nails in at one time, but we're not sure. So let us know if you find out more!

Stay beautiful!

Tuesday, August 28, 2012

DIY Spa Ideas

My youngest sister Ava's DIY Spa

Hello, my lovelies! So Sunday night my youngest sister Ava wanted to test out some spa do-it-yourself's she found online. And since my mom is on a ridiculous "nature food" health kick, our refrigerator is full of all types of fruits and vegetables. Ava got busy and treated me to a lovely spa evening!

I decided to bring my notebook and take notes and pictures during the evening, so I could document everything Ava learned. She taught me a lot of great DIY Spa Ideas, and so now I'm sharing them with you!

Water with lemon
For a most professional and relaxing spa, Ava provided glasses of water with lemon slices. Not only did it look fabulous, it tasted pretty good too. Bonus: lemon water is packed with Vitamin C, can reduce acne, wrinkles, and cleanses your skin from the inside, giving you a healthy glow!

Ava's Spa Treatment began with Heat Therapy. In a small bowl filled with steamy water were hot wash cloths, which we gently rung out and placed on our faces. Then we could lie down and relax with the hot towels resting from the forehead to our noses (so we still had room to breath deeply through our mouths). 

Heat relaxes the muscles, and you'd be surprised how stressed the muscles in your face are from so much usage. This is very calming and relaxing, and so simple!

Oatmeal Facial
Oatmeal has so many uses besides eating it for breakfast. It's a phenomenal skincare ingredient! You can use oatmeal to treat acne, soothe the skin from rashes and poison ivy, and use as a facial scrub! It can help cleanse the pores and soften your skin!

Egg whites are full of protein, vitamins, and minerals. Egg whites have the potential to reduce wrinkles, tighten skin, give a deep cleansing to the pores, and leave your skin soft and supple!

What happens when you combine the two? Ava mixed oatmeal, warm water, and egg whites to create a fantastic deep cleansing, skin softening Oatmeal Facial. And all you need are those three ingredients and a mixing bowl! We applied spoonfuls to a damp washcloth, then massaged that cloth all over our face and relaxed for 6 - 8 minutes. Once the mask starts to dry, or if it feels tight on your face, just rinse it off and feel the softening effects on your skin!

Fresh cucumber slices
Cucumber slices on the eyes can reduce puffiness and erase fatigue. Its cooling effects do wonders for the skin, and cucumbers can soften the skin and improve your complexion. Did you know you can also use cucumbers to treat sunburn? We took some Cucumber Slices and laid them on our eyes as we let our Oatmeal Facials rest on our faces. It was a rejuvenating experience!

At the end of the spa night, I have to say, I was glowing. Next time you want a relaxing spa day, try these DIY Spa Ideas, and let me know what you think! And do you have any of your own DIY Spa Ideas to share? Tell me all about them!

Stay beautiful!

Wednesday, August 8, 2012

The FashPack DIY Contest by Forever 21

Send pics of your redesigned backpacks to Forever 21 to win BIG!
Hello, my lovelies! While checking my emails and Google+, I came across another amazing opportunity, this time not to spend money, but to win money!

I was already planning on redesigning my old backpack to save some cash (and spend that saved cash on makeup), but this is the cherry on the Back to School chocolate cake! It's called the Fashpack DIY Contest by Forever 21. 

This contest is limited to residents of the United States, and the contest ends August 17th, 2012. Entering is simple, here's what to do:

  1. Grab your old, DIY worthy backpack to recreate for this fall.
  2. Design and decorate it any way you want! Glitter, ombre, shredding, painting, it's all up to you! Just make it look fabulous!
  3. Give your newly made backpack a backpack photoshoot and send the best picture to contests@forever21.com. Plus, drop your Instagram or Twitter handle to be a featured favorite!
Easy, right? The backpack with the most creative and fun DIY wins a Forever 21 $210 gift card and 21 exclusive pieces from the Fall 2012 Collection!

So what are you waiting for? Grab your art supplies and that ratty old backpack and get designing!

Stay beautiful!