Showing posts with label photos. Show all posts

Monday, December 3, 2012

Winter Fashion: Puffer Coats


Hello, my lovelies! Happy December! It's time for cold winter days, and a great way to keep warm is by wearing a puffer coat. Puffer coats are stylish winter coats with a bubbled frame. Warm, trendy, and perfect for winter weather!


Friday, November 30, 2012

Fall/Winter Fashion: Oversized Coats


Hello, my lovelies! Today's the last day of November, and I wanted to end the month with a post with a fall/winter fashion trend; oversized coats. I first saw this trend in the Dec/Jan issue of TeenVogue. My Abuela thinks it looks crazy, but I think if you wear it right, it might be flattering... Here are some more pics, and let me know what you think of it!


Stay beautiful!

Sunday, November 25, 2012

Quiz: What's Your Holiday Style?

Hello, my lovelies! I was thinking about how routine Aisles of Beauty seems lately, and I wanted to mix things up a little bit, you know? How about November Surprise #3? I created a cute little quiz for you lovelies to try out, and you can find out what your Holiday Style is! Just answer the questions, and before you hit submit, write down a, b, c, or d for each question on a sticky note. Then hit submit and scroll below to see where your answers match!  Now remember, this is my first try at a quiz, so bare with me!


Mostly A's
Mostly A's - Your holiday style is chill. You prefer to relax at home then be a part of all the hustle and bustle of the holidays. Festive winter sweaters paired with comfy jeans are a perfect look for you! You can rock a soft eye, perhaps pastel eyeshadow, flushed cheeks, and peach or pink lip. There will be a lot of pinks and peaches in your makeup. If you want to spice up the look, contour with a bronzer for a stronger face with the soft features.


Mostly B's
Mostly B's - Your holiday style is carefree. You know how to make any occasion a fun time! Loud, unique colors and prints are perfect for you! Tuck a plain top into a funky skirt, and accessorize with some chunky fun jewelry! A little cat liner on the eyes and tinted gloss on the lips, and you're set! Want to spice it up even more? Colored mascara is perfect for you, swipe a few coats to match your funky skirt, and you're ready to go!


Mostly C's
Mostly C's - Your holiday style is adventurous. You like to create gifts with your imagination and try new things and travel to destinations unknown. You need a look just as imaginative and creative as you are. Winter lace is bold, but elegant, and you can rock it easily. Give your hair a windswept style and wear a bold, red lip. This look is simple, yet exciting, and you can personalize it in more ways than one! Pair faux leather with your lace or add a glittering purse for more adventure.

Mostly D's
Mostly D's - Your holiday style is glamourous. You love the shopping and hustle and bustle of the holidays, and this is your time to shine. The first four letters in glamourous spell glam, and that's a great way to show your holiday spirit! Wear a glitzy, glam dress, and you can keep the rest of your look minimal. Simple black heels, a nude clutch, and a smokey eye are perfect complements to the dress. Create a smokey eye, swipe on a bit of mascara, and you're set for the night!


You don't have to be adventurous to rock a red lip, or chill to wear your favorite sweater. Match up these ideas with your personality, and what you think is fun, and look great for the holidays, which are just around the corner!

Stay beautiful!

Saturday, November 24, 2012

Fall Fashion: Cozy Sweaters

A cozy, slouchy sweater is perfect for fall!
Hello, my lovelies! Did everyone have a fabulous Black Friday? Well, today is Small Business Saturday, so go and support your family and friends and neighbors that own their own businesses!

An Aisles of Beauty reader asked me recently what type of sweaters she should wear with her smokey eye. For those unaware, Sweaters and Smokey Eyes is a gorgeous, classic fall look, and its also the name of my first Youtube video. I teach you how to create the perfect smokey eye to match your fabulous sweaters. Watch it here.

In addition to the sweaters you see in my Youtube video, I thought I'd compile some pics of cute fall sweaters than can easily be paired with a smokey eye... My favorite is the pink sweater you just saw. Here are some more, credit to Tumblr:


As long as you feel comfortable and stylish in the sweater you're in, it's perfect. Enjoy your Small Business Saturday, and get ready for Cyber Monday! 

Stay beautiful!

Sunday, November 11, 2012

Reader's Look: Blue Hair

Maya from Mexico dyed her hair blue in honor of me! I love this girl!
Hello, my lovelies! This weekend has been particularly irritating, because after two amazing nights of The Curious Savage, karma just had to catch up with me and break my computer. I didn't spill anything this time, it just won't let me log into my account! But I had to write an essay for Spanish, so we pulled some strings and here I am on my mother's computer, blogging to you about the highlight of my weekend since Friday.

Today I received the most amazing email from a loyal reader in Mexico named Maya. Talk about Universal Beauty. =) Technically, I already know her personally... She's my Secret Twin! We have the same birthday, June 10, and we keep in touch. Here's the email:
Well Secret Twin!
As you know, I die my streaks quite often! I've had them purple, teal, pink, blonde, and then I died them back to brown for a while. But I got bored with that, and I decided I wanted to die them again. So, in honour of my Secret Twin's debut with blue hair, that's the color I picked for mine as well! How did your play go, anywayz? Are you going to post it on your bloggity blog blog?
Yup. Check out her gorgeous blue locks in honor of my dyeing MY hair blue for the play! Love you Maya! {Want to email me your pics? aislesofbeauty@gmail.com!}

Stay beautiful!

Tuesday, October 30, 2012

How to Conceal a Zit

Yikes! That's a big one!
Hello, my lovelies! Because of Hurricane Sandy, my parade was rained inside all day, but I got a lot of work done, thankfully. Of that work includes this photo tutorial on how to conceal an unsightly blemish. Every teenager gets zits, pimples, blemishes, whatever you want to call them. How to conceal them is a lifelong skill you'll want to know forever.  ;)

Because I have an HD Camera, you can only see the difference slightly, but in person, there's a dramatic difference. Try it out, and you'll see!

You'll Need: Concealer, Foundation, Foundation Brush, Concealer Brush (optional)

I used: Too Faced Flexible Coverage Concealer (but only because it was the only one at my disposal at the time), Sephora Mattifying Foundation, BareMinerals makeup brushes.


Stay beautiful! 

Sunday, October 28, 2012

Maybelline Dream Fresh BB Cream

Maybelline Dream Fresh BB Cream Sample

Hello, my lovelies! Last week, at about 4pm, an idea struck me. I'm well into my Sephora Mattifying Foundation, but because winter aka the season of dry skin is coming up, I've been thinking about switching to a more moisturizing foundation. Then I thought: BB Cream. If you haven't heard of this widespread phenomenon, then you must live under a rock on planet Jupiter, because BB Cream is HUGE. Originating from Asia, BB Cream stands for Beauty Balm, and combines skincare with makeup to create the ultimate 1 step beautifying solution.

Every major makeup brand has its own BB Cream, but I tried Maybelline Dream Fresh, because their marketing team consists of geniuses. In the latest issue of Seventeen Magazine, inside a Maybelline Dream Fresh BB Cream ad was a packet with a free sample of it's light/medium shade and a coupon for $1 off until the end of the year! As a subscriber, I get every issue a month early, but when I first saw the sample I didn't think I'd like it, so I didn't even bother.

Maybelline Dream Fresh BB Cream is an 8-in-1 Skin Perfector. It claims to:
  • Blur imperfections
  • Brighten your complexion
  • Even skin tone
  • Smooth
  • Hydrate
  • Enhance
  • Protect with SPF 30
  • and it has 0% oils and heavy ingredients!
So, I tried it. Nothing to lose, right? I washed my face with a gentle cleanser (that's the before shot) and didn't apply any moisturizer or anything. My face was completely naked (besides some lip balm). Then I applied the BB Cream.

*** Disregard the fact that my face is several shades lighter in the after picture; the light/medium tint was too light for my skin color, and SPF in foundation washes faces out in photographs. If I bought the product I'd get the next shade or two up.

Four words for you: I love BB Cream. I could rave about it for hours, but just look at everything I listed. It did everything it said it would, and you couldn't even tell anything was on my face! Well, besides that it made me look lighter than normal.  =)

There was enough in the sample for 2-3 days, a little goes a long way, so I tried using both with and without my Sephora Mattifying Foundation over it. Because the BB has such sheer coverage, my mattifying foundation helped me get medium to full coverage overall. But I'm sure you could layer it and get enough coverage. A great duo, though!

Overall, I'd score this beauty balm 9.5 out of 10 stars, only because it's so good, it's not fair. My ladies with dark skin can't jump on the Dream Fresh bandwagon, because the color choices are so limiting. Only 5 fresh tones!

This BB cream sells for either $7.44 or $8.99 in the US depending where you buy (I recommend Walmart or Target for the cheaper buy), which I'd say is reasonable for all the benefits it gives you!

That's all for now folks!

Stay beautiful!


Sunday, October 21, 2012

In the Classroom: Nails

These are some nice nails... I'm envious!
Hello, my lovelies! Before anything, I have to wish my older sister Alexis Angelettie a happy SEVENTEENTH BIRTHDAY!!!! Oh gosh, she's getting so old. Gross.

And in other unrelated news, with a fine point pink sharpie, I traced over all the lettering on the keyboard of my MacBook yesterday afternoon... God forbid I end up trying to sell my laptop to Pinky Dinky Doo one day... Does anyone remember that show? The story box? Mr. Guinea Pig?

Alright, never mind with my childhood television preferences. Back to beauty blogging... Uh–where was I? Oh yeah, what's really been on my mind is nails. I'm sure you remember from How to Create Marble Nails that I used to have a terrible habit of biting my nails... Luckily I'm happy to say that I'm wrapping up my 6th week without biting a single nail! Hallelujah! 

To celebrate almost 7 weeks without biting my nails, I'm writing another In the Classroom special, this time on, well, nails. And just like In the Classroom: Skincare, I'll be breaking this into parts. This first part is all about the anatomy of your nails.


Credit to curesforbeauty.com for this image.
The basic anatomy of a fingernail includes:

  • The Cuticle - a thicker layer of skin between the nail and your skin to protect from infection. 
  • The Lunula - a white semicircle or moon at the base of the nail.
  • The Nail Bed - also known as the body of the nail, is the pinkish part, and the largest portion of your nail.
  • The Free Edge - the white nail that contributes to the length of your nails; the part that can be filed and shaped.
  • The Lateral Nail Fold - the separation between your nail and the rest of your finger.
I'm sorry, but I just can't believe you don't remember Pinky Dinky Doo. So I've provided you with a helpful reminder of the wonderful show that taught us Big Fancy Words and hatred of the color pink (alright, that last part didn't rub off on me). 


Okay, if you still don't remember this absolutely amazing girl with the pink hair who ironically enough hates the color pink, then you better go to Youtube right now and watch some old episodes.

Oh yeah, and come back tomorrow for Part Two of In the Classroom: Nails. Hehe.

Stay beautiful! 

Sunday, September 23, 2012

Being Photogenic

I used the app "Fotorus" to make this look so awesome!
Hello, my lovelies! OK, so rather than hopelessly wait until my Writer's Block disappears, I'm forcing myself to sit down and write.

So what's on my mind today, you ask? Photography. Being photogenic, in particular. Some of my friends are extremely photogenic. If you sneak up on them and take a picture, you'd think they knew it was coming, because they always look so perfect!

Me, on the other hand... I'm not so photogenic. And I hate getting my picture taken, because I can't see how to turn my head or how my hair looks or how big my smile is... So School Picture Day always gets on my nerves.

When I take pictures myself, it takes about 3 dozen tries before I take one I actually like... And then I put it on Instagram (hehe). I'd like to know if being photogenic is something you're born with, or if you can develop it... Sort of like a talent. Hmmmm... 

What do you think, dearest readers? Quite thought provoking, if you ask me.

Stay beautiful!

Monday, September 10, 2012

Top 5 Party Must Haves

A picture I took at the Bar Mitzvah I went to...
Hello, my lovelies! So this weekend, I went to my close friend Jacob's Bar Mitzvah, and it was absolutely amazing! I have to say it made the Top 3 without question. Unfortunately I didn't film myself putting on my makeup, but I'll redo the makeup for a tutorial later this week.

Every time I've prepared for a Bar/Bat Mitzvah, or any party where I know I'll be dancing, I always freak out about what to wear and what to bring and all that jazz. By now I've mastered the art, and thought I'd enlighten you on Party Must Haves, besides the gift.

What to Wear: Keep it light. With dancing comes sweating, and heavy clothes are just going to make that worse. Even if it's hailing in the middle of winter, it's going to be hot on the dance floor surrounded by people! To this one I wore a leopard print dress... But get this, I tucked it into some skinny jeans to make it more casual. It was very cute!

Makeup: I cannot stress this enough: Dancing = Sweating. Don't wear creme eyeliner or any kind of smudging makeup. Here's what I did: I wore my Sephora Mattifying Foundation to keep the shine off of my face, did my signature party bronze smokey eye, and added a nude lip. I kept my mascara minimal; just enough to put some "umph" in my lashes. If you have to wear liner, make it liquid liner, because that's the least "smudgeable" type.

Me at a Bat Mitzvah earlier this year.
In my purse: I brought my foundation brush and my Sephora Mattifying Foundation for touch ups, because that last thing I needed was a face covered in shine! I also brought mascara for touch ups, and lip gloss of course. Oh, and hair products! I always bring a comb and ponytail holders, because your hair may get a little wild and crazy like mine. And I always bring a needle and thread in case of a fashion emergency. I recommend safety pins if you can't sew, in fact that's better, I just can't ever find safety pins around my house anymore!

So here's your Top 5 Must Haves:

  1. Light Clothing
  2. Hair Supplies (comb, hair ties)
  3. Mattifying Powder of some sort
  4. Touch-Up Makeup (mascara, liquid liner, lip gloss, etc.)
  5. Safety Pins (or needle and thread)
Simple enough, right? Good luck at your next big bash, and have fun!

Stay beautiful!

Wednesday, August 29, 2012

How to Create Marble Nails

I made a collage of all types of marble nail looks!
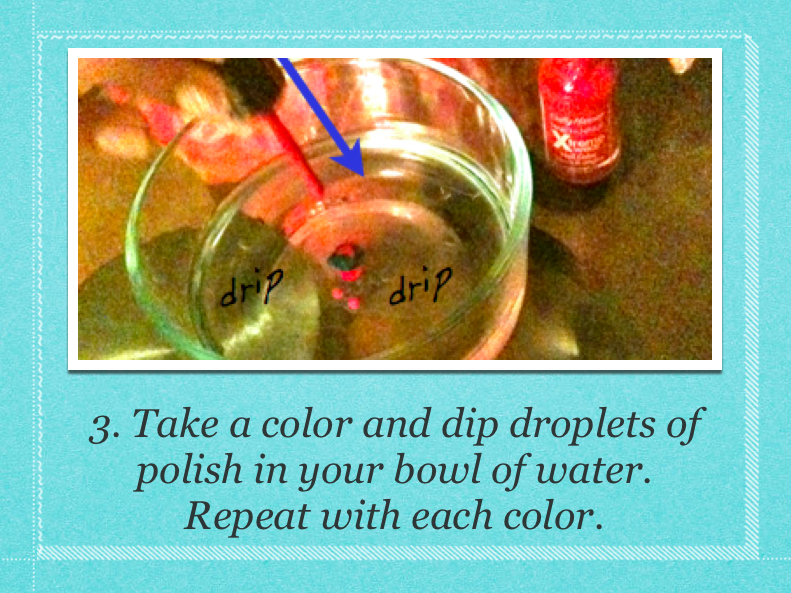
Hello, my lovelies! In addition to researching great DIY Spa Ideas, my youngest sister Ava learned how to create Marble Nails. Usually, I don't pay much attention to the latest nail trends, because I have the terrible habit of biting my nails, and I've never really been able to do much with my nails because of that. But Ava has long, gorgeous nails, and so I took pictures of her attempting Marble Nails, and made a photo tutorial for you so you can try it too! 

You will need: a small bowl, 2-3 nail polish colors, tape, and tissues/paper towels.


*** We only tried this with two nails/one at a time. The first nail is the one you see in the pictures. The second time didn't turn out so well, so we came to the conclusion you have to use fresh water/paint every time. Maybe you can dip multiple nails in at one time, but we're not sure. So let us know if you find out more!

Stay beautiful!

Tuesday, August 28, 2012

DIY Spa Ideas

My youngest sister Ava's DIY Spa

Hello, my lovelies! So Sunday night my youngest sister Ava wanted to test out some spa do-it-yourself's she found online. And since my mom is on a ridiculous "nature food" health kick, our refrigerator is full of all types of fruits and vegetables. Ava got busy and treated me to a lovely spa evening!

I decided to bring my notebook and take notes and pictures during the evening, so I could document everything Ava learned. She taught me a lot of great DIY Spa Ideas, and so now I'm sharing them with you!

Water with lemon
For a most professional and relaxing spa, Ava provided glasses of water with lemon slices. Not only did it look fabulous, it tasted pretty good too. Bonus: lemon water is packed with Vitamin C, can reduce acne, wrinkles, and cleanses your skin from the inside, giving you a healthy glow!

Ava's Spa Treatment began with Heat Therapy. In a small bowl filled with steamy water were hot wash cloths, which we gently rung out and placed on our faces. Then we could lie down and relax with the hot towels resting from the forehead to our noses (so we still had room to breath deeply through our mouths). 

Heat relaxes the muscles, and you'd be surprised how stressed the muscles in your face are from so much usage. This is very calming and relaxing, and so simple!

Oatmeal Facial
Oatmeal has so many uses besides eating it for breakfast. It's a phenomenal skincare ingredient! You can use oatmeal to treat acne, soothe the skin from rashes and poison ivy, and use as a facial scrub! It can help cleanse the pores and soften your skin!

Egg whites are full of protein, vitamins, and minerals. Egg whites have the potential to reduce wrinkles, tighten skin, give a deep cleansing to the pores, and leave your skin soft and supple!

What happens when you combine the two? Ava mixed oatmeal, warm water, and egg whites to create a fantastic deep cleansing, skin softening Oatmeal Facial. And all you need are those three ingredients and a mixing bowl! We applied spoonfuls to a damp washcloth, then massaged that cloth all over our face and relaxed for 6 - 8 minutes. Once the mask starts to dry, or if it feels tight on your face, just rinse it off and feel the softening effects on your skin!

Fresh cucumber slices
Cucumber slices on the eyes can reduce puffiness and erase fatigue. Its cooling effects do wonders for the skin, and cucumbers can soften the skin and improve your complexion. Did you know you can also use cucumbers to treat sunburn? We took some Cucumber Slices and laid them on our eyes as we let our Oatmeal Facials rest on our faces. It was a rejuvenating experience!

At the end of the spa night, I have to say, I was glowing. Next time you want a relaxing spa day, try these DIY Spa Ideas, and let me know what you think! And do you have any of your own DIY Spa Ideas to share? Tell me all about them!

Stay beautiful!